Jupiter will be at opposition (opposite the Sun in our sky) in late October. This is when it is closest to Earth and therefore largest and brightest. It’s around this time it becomes very noticeable as a bright yellowish beacon in the east as it gets dark. You cannot mistake it for any other object as it is far far brighter than any star.
This is also the time when every astrophotographer tries to get good images of Jupiter (and its four Galilean Moons). I’m no exception. I’ve taken a few images of Jupiter before but I don’t really have the right telescope for planetary imaging. Telescopes with long focal lengths (high focal ratios) are usually better and I have a short focal length widefield telescope as my main instrument.
This doesn’t deter me from trying of course and I have a DMK 21AU04.AS camera for just this job. The camera takes monochrome avi videos of whatever it sees and by taking the individual frames from the video and stacking only the very sharpest you can beat the seeing. Seeing is where the object you are watching wobbles about and flicks in and out of focus due to air currents in the atmosphere.
The other evening (24th September) I used the DMK camera, my 200mm F/4 Newtonian telescope, Astronomik RGB filters in a filter wheel and a Televue 5x Powermate to take three videos of Jupiter of 1000 frames each at 30fps. One through a red filter, one through green and one through blue. This gives a decent number of frames to work with in a not too massive file. The Powermate makes Jupiter a decent size on the imaging chip, we want to cover as many pixels as possible to get the maximum amount of detail.
By stacking the best 1/3 of the frames in Registax software I obtained three monochrome images of Jupiter. The clever bit comes when you combine these three images together, making the monochrome image taken through the red filter monochrome red, green as green and blue as blue. When you do this, as if by magic you get a colour image of Jupiter! I used Astra Image 3.0SI software to do the combining.
After creating the RGB image I did a small amount of post-processing in Astra Image 3.0SI. Deconvolution works wonders to bring out the sharpness, followed by a little curves and colour adjustment. This is mostly trial and error and personal preference, it’s easy to overdo post processing and end up with an over sharpened or too saturated image if you’re not careful.
Voila, one pretty decent colour image of Jupiter, showing details in the cloud bands and the Great Red Spot (which is actually a pale pink colour).
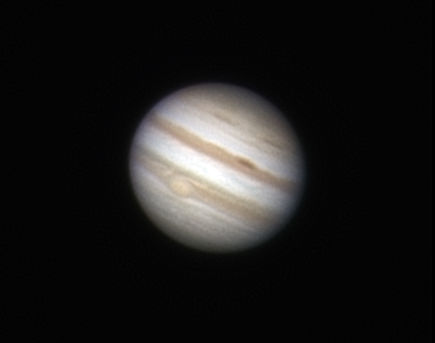
Notice the less abrupt edge to Jupiter on the right-hand side. Before opposition we are able to see slightly around to the night-side of the planet here and the cloudy atmosphere of the planet means there isn’t a sharp edge between night and day like there is on the Moon.
This is probably the best image I’ve taken of Jupiter so far helped by the exceptionally good seeing on this evening. Hopefully we will get more good evenings as opposition approaches and Jupiter gets a little bit bigger. I will be out trying to better this and/or get some satellite events too, e.g. moon shadows and transits.
Thanks to the power of twitter and retweets this image has had over 1500 views on Flickr!