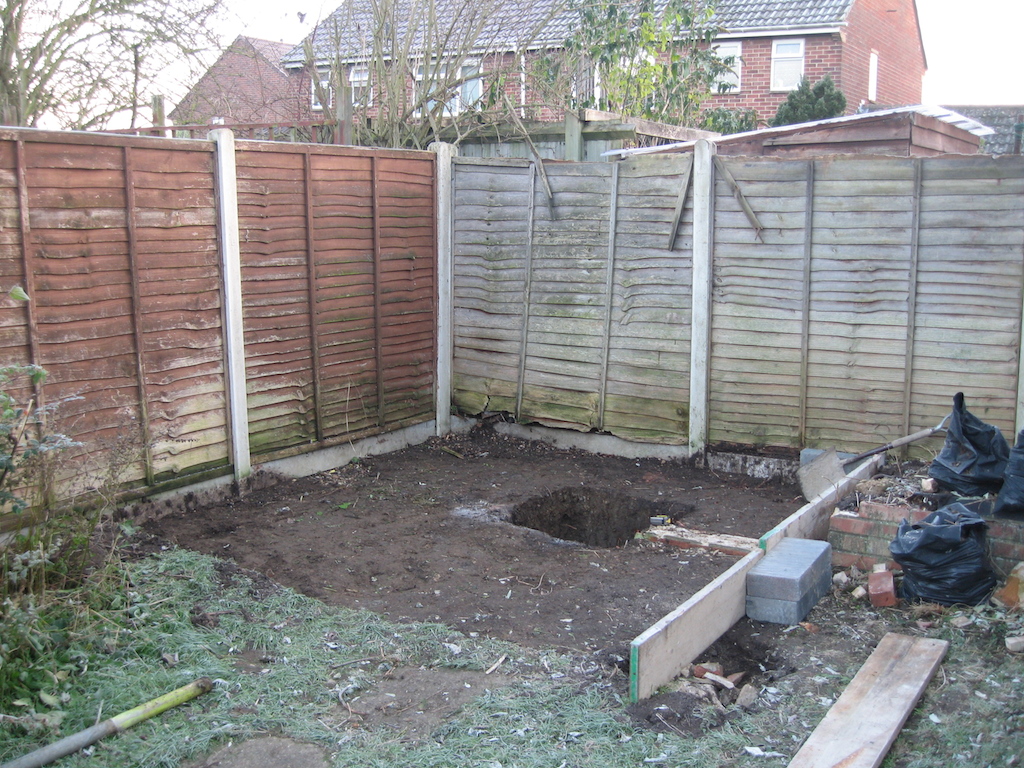
The foundations for the observatory and pier were dug yesterday by the builder and are being filled with concrete today.
Observatory base dug out ready for concrete
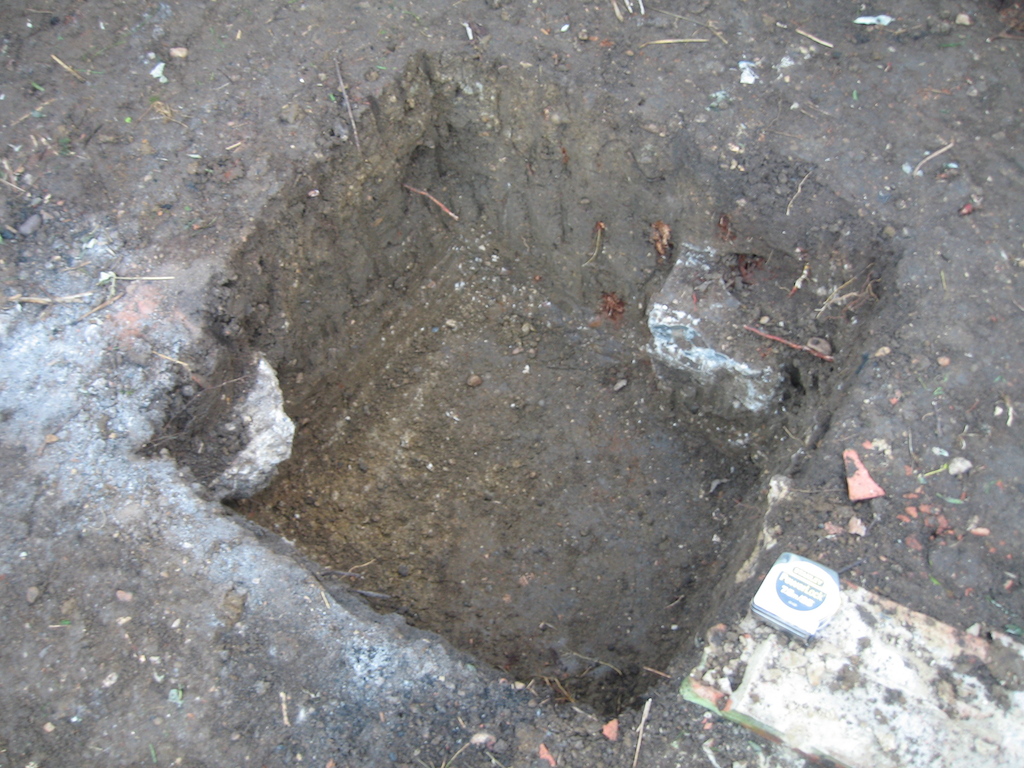
The hole for the pier has been dug down to the very stiff clay/gravel of the Summertown-Radley Sand and Gravel Member drift deposit which underlies the garden (about 500mm deep). Speaking from experience this deposit is extremely difficult to dig by hand!! Once filled with concrete this will be a very firm foundation for the telescope pier which will be bolted to it.
Hole for pier foundations down to the very stiff clay/gravel ballast
It’s been nearly two years since Part 1 and not a lot has happened to my observatory build in that time! But things are moving apace now. I have sourced, bought and collected a 2nd hand Alexander’s Observatories 8’x8′ rolling roof observatory shed which belonged to a member of a local astronomical society who sadly passed away suddenly in the summer. It’s a very sturdy building and very heavy (the roof especially).
I have a local builder coming next week to dig out and lay a 3m x 3m concrete slab for it to live on where I started clearing space in 2011. He will also dig a hole down to the stiff ballast (about 500mm deep) to which I will bolt a steel pier.
Once that is laid I can re-erect the observatory which was originally screwed together (we had to cut some of the screws) but I will bolt together for easier dismantling in the future. I will also insulate the walls to help keep the inside a bit cooler in the summer. After the walls and roof supports are erected I will need to arrange a topping-out ceremony by inviting several friends around to help me lift the roof into place, it took seven of us to lift it off from it’s original location so I’m expecting similar will be required to put it back on again!
After the building is complete I will need to buy a pier and bolt that to the concrete foundations. I’m also planning a new mount and telescope to go on top of that.
It’s all moved very quickly in the past couple of weeks and I hope to have the observatory erected by Christmas if I can. I’ll post some pictures as the work progresses!
I’ve finally got around to starting to build an observatory. After several false starts and several years of saying I must build an observatory I’m finally doing it! Finally got fed up of polar aligning etc. before observing, it will also help enormously with my asteroid accultation observations.
The observatory will be positioned in the NE corner of my garden which is furthest from the house. This will be give me good views to the SW and W. The E horizon won’t be as good and the SE will be largely hidden, this isn’t a big problem as Didcot Power Station is only a kilometre away in that direction and is a massive light polluter. The plume from the cooling towers often obscures the NE to SE as well.
The pier will be off-centre, 3′ from the W end of the shed, the roof will roll-off to the W so I need to think about how high that will be. Electricity will be supplied from the house using a caravan lead and connectors.
This is the site before I did anything. Unfortunately this corner has become a bit of a dumping ground for previous projects and has got overgrown. The previous owners built this wall across the bottom of the garden and filled in behind with soil.
The peg is roughly where the corner of the observatory will be. The green stand roughly where the pier will be.
The first job was to remove all the vegetation and to treat the fence panels. I installed the fence several years ago and annoyingly the neighbour at the end of the garden has piled up a load of spoil against the rear panel and this will need replacing. This is how the site looked after my first afternoon of preparatory work.
You can see the large pile of soil and rubble that needed shifting! Part of the wall will need to be demolished and my temporary patio slabs lifting (they are just on the soil).
Two more afternoons and 26 rubble sacks filled with spoil and taken to the tip later and the site looks like this.
Still plenty more to shift but the worst is done. I’m going to lay a concrete base for the observatory so I will use some of the bricks from the wall as hardcore. The ground slopes to where I took the photo so there isn’t actually too much to dig out from in front of the wall. I hope to finish the groundworks over the winter and get the shed built in the spring.
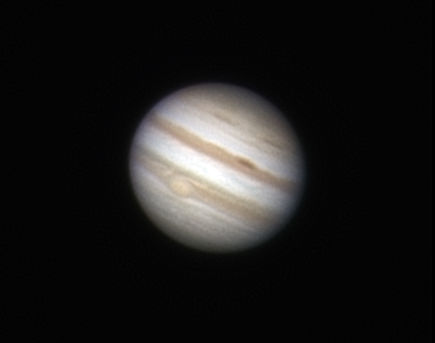
Jupiter will be at opposition (opposite the Sun in our sky) in late October. This is when it is closest to Earth and therefore largest and brightest. It’s around this time it becomes very noticeable as a bright yellowish beacon in the east as it gets dark. You cannot mistake it for any other object as it is far far brighter than any star.
This is also the time when every astrophotographer tries to get good images of Jupiter (and its four Galilean Moons). I’m no exception. I’ve taken a few images of Jupiter before but I don’t really have the right telescope for planetary imaging. Telescopes with long focal lengths (high focal ratios) are usually better and I have a short focal length widefield telescope as my main instrument.
This doesn’t deter me from trying of course and I have a DMK 21AU04.AS camera for just this job. The camera takes monochrome avi videos of whatever it sees and by taking the individual frames from the video and stacking only the very sharpest you can beat the seeing. Seeing is where the object you are watching wobbles about and flicks in and out of focus due to air currents in the atmosphere.
The other evening (24th September) I used the DMK camera, my 200mm F/4 Newtonian telescope, Astronomik RGB filters in a filter wheel and a Televue 5x Powermate to take three videos of Jupiter of 1000 frames each at 30fps. One through a red filter, one through green and one through blue. This gives a decent number of frames to work with in a not too massive file. The Powermate makes Jupiter a decent size on the imaging chip, we want to cover as many pixels as possible to get the maximum amount of detail.
By stacking the best 1/3 of the frames in Registax software I obtained three monochrome images of Jupiter. The clever bit comes when you combine these three images together, making the monochrome image taken through the red filter monochrome red, green as green and blue as blue. When you do this, as if by magic you get a colour image of Jupiter! I used Astra Image 3.0SI software to do the combining.
After creating the RGB image I did a small amount of post-processing in Astra Image 3.0SI. Deconvolution works wonders to bring out the sharpness, followed by a little curves and colour adjustment. This is mostly trial and error and personal preference, it’s easy to overdo post processing and end up with an over sharpened or too saturated image if you’re not careful.
Voila, one pretty decent colour image of Jupiter, showing details in the cloud bands and the Great Red Spot (which is actually a pale pink colour).
Notice the less abrupt edge to Jupiter on the right-hand side. Before opposition we are able to see slightly around to the night-side of the planet here and the cloudy atmosphere of the planet means there isn’t a sharp edge between night and day like there is on the Moon.
This is probably the best image I’ve taken of Jupiter so far helped by the exceptionally good seeing on this evening. Hopefully we will get more good evenings as opposition approaches and Jupiter gets a little bit bigger. I will be out trying to better this and/or get some satellite events too, e.g. moon shadows and transits.
Thanks to the power of twitter and retweets this image has had over 1500 views on Flickr!
We were a bit late booking anything for holidays this year and were considering Scotland. We couldn’t face the long drive for 10 days so we hit upon the brainwave of going to Camping de la Bien Assise in Guînes just south of Calais in northeast France. We’d stayed there a couple of times before for one night whilst heading further afield in Europe and had said we should try a longer stay. The drive around the M25 to Dover is hideous of course but 3 hours is better than 6 and with the added excitement of a ferry journey to a foreign country too!
We had a fab time, decent weather (couple of beasty storms as well), nice beaches, good countryside, great campsite, excellent historic sites. Here is a cheesy video which sums it up (thanks to iMovies trailers).
I have imported all the posts and comments from my old blog that was in ExpressionEngine. I need to kill that off as it’s using a lot of my webspace and is out of date and gets spammed.
I’m having to re-categorise a number of my posts and I need to go through the comments deleting the spam, so things might look a bit odd here for a few days as I do all of that. Links to images and stuff will still go to the old site until I fix them all.
I want to also move my LEJOG diary across here at some point as that’s sitting in an ExpressionEngine site as well. I’ve moved the diary posts but not the static pages yet.
This was my third Audax for the 2011 season and the first I’ve entered without my brother. The start is only a few kilometres from my front door so it is a very convenient event for me to enter. There are 110km and 200km events but I’m not quite ready for the step up to 200km so entered the 110km event. The route heads westwards from Milton in Oxfordshire across the Vale of White Horse to Barbury Castle in Wiltshire on the North Wessex Downs.
I was lucky to have a fellow CTC Wantage member to tag along with. He’s ridden the event several times so knew the route well. This meant I didn’t have to refer to the route description sheet at all. He’s also a very strong rider so we held a quick pace.
The route westwards to Wantage along the A417 is a familiar one and also beyond on the B4507 past White Horse Hill, Ashbury and Bishopstone. This is an undulating road but you can keep a good steady pace.
The weather was pretty grim along here, strong headwind and rain but nothing really terrible.
After Bishopstone I was in new territory so I’m glad I had company so I didn’t miss any turns. After several picturesque villages we arrived at the foot of the climb to Barbury Castle. A narrow and straight road means you can see it from a long way away. This is the first time I had climbed the hill so I wasn’t sure what to expect, or how long it was. It’s steep (about 15%) but not all that long so it wasn’t too tricky. At the top was the control point, cakes and refreshments (the café is currently closed).
After a brief stop we took the descent rather steady due to the wet road and loose gravel and stones. After retracing our steps to Chiseldon, quickly now the wind was behind us, we headed to the next challenge of Snap Hill. I found this one quite a bit harder, it’s longer and steeper (17%) than Barbury Castle but once over the top you are rewarded by a very long and fast descent, we kept a constant 30+ mph for quite a distance to Aldbourne.
The third major hill on the route is Marridge Hill. This one is barely worth a mention, much shallower than the other two, quite long but not a severe test other than the legs are pretty tired by this stage.
Big black clouds threatened to drench us as we headed to Eastbury and Great Shefford where we arrived just before the shop shut to grab a sandwich and provisions. We were pretty lucky and missed the worst of the downpours which effected some of the riders behind us on the event.
The final stretch home via Farnborough and West Ilsley is again familiar territory for me. We passed one of my table tennis venues on the way. The A34 was new to me though, a road I have always avoided cycling along as it is extremely busy and basically a motorway in all but name.
The short link between Chilton and West Ilsley is the only way across the Berkshire Downs at this point though (until a new cycle route is hopefully opened nearby). We cycled fast and hard in the rain to get it done quickly. It’s only about 1km and we encountered no lorries.
I put a spurt on for the last few kilometres but rather annoyingly suffered a puncture on Milton Hill with the finish almost in sight. After cursing my rotten luck I stopped and quickly replaced the innertube hoping no other riders would pass me.
The delay was about 10 minutes and I arrived back at Milton as the 3rd finisher in a total time of around 5h15m (I’ll know what time I’ve been given when I get my card back). It was also my quickest 100km cycled in 4h5m37s.
A really good route and an Audax I’ll be doing again. Hopefully the weather will be a bit nicer next time. Not that rain bothers me too much to be honest, once you are wet you are wet. Battling against a headwind is worse.
I’ll be trying to do another two 100km Audaxes this season for the Brevet 500 award.
Great ride with CTC Wantage today. The Cotswolds (if you don’t know) are an area of outstanding natural beauty which straddles Oxfordshire and Gloucestershire. The landscape is rolling and peppered with picturesque villages with houses built from the golden oolitic limestone which the hills are made from. Oxfordshire is not well known as being a hilly county but the Cotswolds offer some tough climbs, especially on the escarpment side. Even on the dip slope side you will rarely find a road that isn’t going up or down, sometimes steeply.
We started in Burford, one of the larger towns in the Cotswolds and a popular tourist destination. Its iconic feature is the steep high street leading down to the River Windrush. It also has a large free car park. We followed the river to Bourton-on-the-Water, which is hugely popular with day trippers and tourists. On a sunny summer weekend afternoon it can be heaving with visitors. It is very picturesque but pick a quiet day to visit.
The rolling terrain led us past the Snowshill lavender fields to Broadway Tower which stands over 300m above sea level, the second highest point in the Cotswolds. The tower itself is a folly tower built so that Lady Coventry could answer the question whether she could see it from her house in Worcester! She could.
From the tower we took more rolling and quiet lanes to Bibury, another village popular with tourists, before heading back to Burford.
We were just shy of 100km for the day and over 1100m of ascent. I found it quite tough today as I hadn’t got my climbing legs with me but had a 2nd wind at around 55miles and could have kept going for a bit longer. It’s another ride towards my target of E50!
If you’ve not cycled the Cotswolds before it’s well worth doing. The route we chose offers a good tour of some busy and quiet villages sticking to minor roads. A good sample of what the Cotswolds offer without tackling any of the really tough climbs.
Sir Arthur Stanley Eddington is well known as a British astrophysicist of the early 20th century. The Eddington limit, the natural limit to the luminosity of stars, or the radiation generated by accretion onto a compact object, is named in his honour. He is famous for his work regarding the Theory of Relativity. He was also a keen cyclist.
The Eddington Number is defined as E, the number of days a cyclist has cycled more than E miles
For example an Eddington Number of 70 would imply that a cyclist has cycled more than 70 miles in a day on 70 occasions. Achieving a high Eddington number is difficult since moving from, say, 70 to 75 will probably require more than five new long distance rides since any rides shorter than 75 miles will no longer be included in the reckoning.
I stumbled upon his interesting cycling statistic the other day and was curious as to what my Eddington number might be. I only have accurate distance stats from 2008 but I rarely if ever did long distance rides before then so I’ll just discount anything earlier.
Interestingly it works out that my current Eddington number is 49 (E49) and I’m only 5 rides of greater than 50 miles to achieve a milestone E50.
Not sure whether discovering this little statistic was such a good idea, I’m now motivated to do those 5 rides but then when will it stop? I’m not that far off E60 either!!
P.S. Eddington himself died at E87.
UPDATE – On 25th September 2011 I completed a 171km Audax ride which was my 50th ride over 50 miles. I’m now officially an E50 cyclist!!
UPDATE – On 9th June 2013 I reached E60! It’s going to be tough from here, E65 is probably achievable fairly soon, E70 will take much longer.
UPDATE – On 20th July 2014 I reached E65! It’s still a long while before I achieve E70.
UPDATE – As of 9th November 2015 I am E67. It will still take me a while to get to E70!
I’m about to embark on part two of my and my brother-in-law Andrew’s coastal tour of Wales which may or may not end up being extended further around the coast of Great Britain.
In 2010 we cycle camped from Aust on the English side of the Severn Bridge to Aberystwyth in a week. Including some tough cycling along the Pembrokeshire coast.
In 2011 we plan to start from Aberystwyth and head north sticking to the coast as closely as possible whilst avoiding silly hills and main roads wherever possible. We’ll head along the Lleyn peninsula and right around the coast of Anglesey. We aim to finish at Liverpool after cycling around the coast of the Wirral as returning home by train is a bit easier from there than from our initial destination which was to be Chester.
We’ll be camping each night and aim to cover around 50-60 miles (80-100 km) per day.
If you want to keep an eye on how we get on I’ll hopefully be doing daily diary entries on crazyguyonabike.com and I’ll be tweeting from the road.


 Sir Arthur Stanley Eddington is well known as a British astrophysicist of the early 20th century. The Eddington limit, the natural limit to the luminosity of stars, or the radiation generated by accretion onto a compact object, is named in his honour. He is famous for his work regarding the Theory of Relativity. He was also a keen cyclist.